Gimp photo stack
Status
The Gimp photo stack script was originally written by Ian Cameron Smith. Unfortunately, the script was left unmaintained. Even the web pages dedicated to the script on his site have been removed. The original script was written for the Gimp 1.0.x. I patched it, and tried to contact the original author. This failed, which is why I decided to host the modified script myself. Most of the content of this page is copied from the original author, hopefully with his consent.
Gimp
The Gimp is an excellent PhotoShop-like image package for Unix. It's extremely powerful, with full layer support, and tons of tools. It's also hugely extensible, by either plug-ins or easy-to-write scripts; it comes with over 100 plug-ins as standard and almost as many scripts, and there are many more on the net. Oh, and of course it's free.Check out the official Gimp home page for full information, and for the software itself.
Photo stack
Just to show you that any old fool can enhance the Gimp... here's my very own Photo stack script.
Basically, I wanted a simple way to make photos look nicer on a web page. Just sticking a border around them seemed a bit boring, so I tried simulating a pile of photos, with the one of interest on top. It looked so nice, I wrote a script to do it.
A picture speaks 1024 words, of course...
| Before | After | |
|---|---|---|
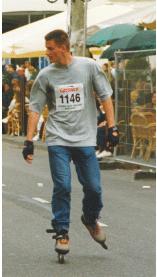 |
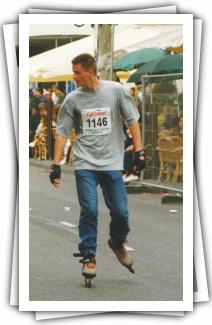 |
|
Photostack for Gimp 1.2 Photostack for Gimp 1.3-2.2 Photostack for Gimp 2.4+ Photostack for Gimp 2.6+ |
To use it, simply place it in your script directory; normally $(HOME)/.gimp/scripts, or the installation's script directory, which is normally /usr/local/share/gimp/scripts. The next time you start the Gimp, it should be registered automatically. Photo Stack is known to work with Gimp version 1.2.x, 1.3.14, 2.2.17, 2.4 and 2.6.
Once running, open the picture in a window and, from the window's background menu, select "Script-Fu -> Modify -> Photo Stack". You'll be prompted with a whole bunch of options, but just clicking "OK" will generate an effect like the one above.
The following options are supported (with the defaults given in brackets):
- Border Color (white):
- The color of the border added to the image.
- Border Width (10):
- The width in pixels of the border added to the image.
- Pictures in Stack (3):
- The number of pictures in the final stack, including the original image.
- Rotate Sloppiness (100):
- Amount of rotational sloppiness to add to each picture. 0 means don't rotate them.
- Move Sloppiness (10):
- Amount of sideways sloppiness to add to each picture. 0 means don't move them.
- Top Straight (TRUE):
- If TRUE, keep the top image straight; otherwise, skew it like the others.
- Add Shadow (TRUE):
- If TRUE, add a shadow to each layer (recommended).
- Shadow Radius (12.0):
- Blur radius in pixels used to generate each layer's shadow.
- Shadow Weight (100%):
- Opacity for the shadow layers: 0 - 100.
- Work on Copy (TRUE):
- If TRUE, everything is done on a copy of the original image (highly recommended).
- Flatten Layers (FALSE):
- If TRUE, the image is merged into a single layer when all's done, and autocropped.
The final image will have a transparent background; just doing "Layers -> Flatten Image" will add a solid backgrohnd in the current background colour.
Some remaining problems:
- Unless the user elects to flatten the resulting image, I don't autocrop it, and you're left with a huge image. I need an autocrop which takes into account the sizes and extents of all the layers, not just the current one, to fix this.
- With very large "move sloppiness" values, you could get a clipped image.
- Using this on a multi-layered source will discard the layers.
- Undo doesn't work, I think largely because of the "Add Border" script. I could do the border adding within the script easily enough and fix that. If in doubt, choose "Work on Copy".
Contributions of fixes are most welcome. Enjoy!